#install wordpress theme without ftp
Explore tagged Tumblr posts
Visit Tumblr Blog
Explore Tumblr blogs with no restrictions, modern design and the best experience.
Last Seen Tumblr Blogs


Fun Fact
When “GIF” was named word of the year in 2012, Oxford Dictionaries U.S.A. credited Tumblr for pushing the word.
Text
Boost Your Online Presence with Hostinger in 3 Simple Steps 🚀
Want to take your online presence to the next level? Whether you’re launching an online store, a creative portfolio, or a travel blog, Hostinger is here to support you. Here’s how I built my site in no time:
1. Choose the Right Plan I went with the Premium Shared Hosting plan—perfect for getting started without breaking the bank. It offers plenty of resources to handle growing traffic.
2. Quick Setup In just a few clicks, WordPress was automatically installed thanks to the one-click installer. No more wrestling with FTP files!
3. Customize & Launch I picked a responsive theme, added my products/posts, and was live in under an hour. The free SSL certificate and included domain saved me extra fees.
💡 Pro Tip: Enable LiteSpeed caching in your dashboard to optimize speed and boost your SEO.
“In just 24 hours, I saw my first sales come in thanks to a fast and reliable landing page.”
🔗 Take advantage of Hostinger’s offer starting at €1.99/month by clicking here: https://www.hostinger.com/referral?REFERRALCODE=1ABDELOUAHD35
0 notes
Text
Jobs Portal Nulled Script 4.1

Download the Best Jobs Portal Nulled Script for Free Are you looking for a powerful, customizable, and free job board solution to launch your own employment platform? The Jobs Portal Nulled Script is your ideal solution. This fully-featured Laravel-based job board script offers premium functionality without the high cost. Whether you're building a local job site or a global hiring platform, this nulled script gives you everything you need—completely free. What is the Jobs Portal Nulled Script? The Jobs Portal Nulled Script is a premium Laravel-based job board application designed for businesses, HR agencies, and entrepreneurs who want to build a seamless job posting and recruitment website. The script comes packed with advanced features like employer and candidate dashboards, resume management, email notifications, location-based job search, and more—all without any licensing fees. Why Choose This Nulled Script? Unlike expensive premium plugins or themes, this Jobs Portal Nulled Script offers unmatched value. It provides a user-friendly interface, customizable design, and enterprise-level tools to make recruitment easier for both job seekers and employers. Plus, it's completely free to download from our site, allowing you to save money while building a professional job board. Technical Specifications Framework: Laravel 8+ Database: MySQL 5.7 or higher Language: PHP 7.4+ Responsive Design: Fully mobile-optimized API Ready: RESTful API endpoints available SEO Optimized: Built-in tools for on-page SEO Top Features and Benefits Employer & Candidate Dashboards: Tailored experiences for recruiters and job seekers. Smart Resume Management: Easily manage and filter resumes by job category and skills. Advanced Job Search: Location and keyword-based filtering for accurate results. Email Alerts: Automated job notifications for registered users. Payment Integration: Support for paid job postings with multiple gateways. Multi-language Support: Reach users across the globe effortlessly. Who Can Use This Script? The Jobs Portal Nulled Script is versatile and ideal for: HR agencies wanting a digital recruitment platform. Startups looking to monetize job listings or applications. Universities or colleges offering campus recruitment tools. Freelancers who want to provide job board services to clients. How to Install and Use Installing the Jobs Portal Nulled Script is straightforward: Download the script from our website. Upload the files to your server using FTP or a file manager. Create a MySQL database and import the provided SQL file. Edit the .env file to include your database credentials. Run the Laravel migration and seed commands to set up the tables. Visit yourdomain.com to start configuring your job portal! No technical expertise? No worries. The documentation provided makes it easy even for beginners to set up a complete job board system. FAQs – Frequently Asked Questions Is the Jobs Portal Nulled Script safe to use? Yes, we carefully scan and verify all files to ensure they are free of malware or backdoors. However, always install scripts in a secure environment. Can I customize the script? Absolutely. Since it’s built on Laravel, you have full control to customize routes, models, views, and controllers to fit your unique business model. Does the script support third-party integrations? Yes. You can integrate third-party services like payment gateways, newsletter tools, and analytics platforms with ease. Is it legal to use a nulled script? While we provide the script for educational and testing purposes, always ensure you comply with local software laws and licensing terms if you go live. Recommended Tools for WordPress Users If you're managing your site with WordPress, we recommend using UpdraftPlus Premium nulled for effortless backups and restoration. For search engine optimization, All in One SEO Pack Pro is a must-have tool to help your website rank faster and more effectively.
Take your online recruitment platform to the next level today. Download the Jobs Portal and build a modern, scalable, and highly effective job board without spending a dime!
0 notes
Text

How to Set Up Your Local Development Environment for WordPress
Setting up a local development environment is one of the best ways to experiment with and build WordPress websites efficiently. It offers you a safe space to test themes, plugins, and updates before applying changes to a live site. Whether you’re a beginner or an experienced developer, having a local environment is essential in streamlining your workflow and minimizing website downtime.
Before we dive into the technical steps, it’s worth mentioning the benefits of WordPress for your business website. WordPress offers unmatched flexibility, scalability, and user-friendliness, making it an ideal platform for businesses of all sizes. When paired with a solid local development setup, WordPress becomes even more powerful in enabling fast and secure site builds.
Step 1: Choose Your Local Development Tool
There are several local development tools available that cater specifically to WordPress users:
Local by Flywheel (now Local WP): Extremely beginner-friendly with features like SSL support and one-click WordPress installs.
XAMPP: A more general-purpose tool offering Apache, MySQL, PHP, and Perl support.
MAMP: Ideal for macOS users.
DevKinsta: Built by Kinsta, it offers seamless WordPress development and staging capabilities.
Choose the one that suits your OS and comfort level.
Step 2: Install WordPress Locally
Once you’ve chosen your tool:
Install the software and launch it.
Create a new WordPress site through the interface.
Set up your site name, username, password, and email.
After setup, you’ll get access to your WordPress dashboard locally, allowing you to install themes, plugins, and begin your customizations.
Step 3: Configure Your Development Environment
To ensure an efficient workflow, consider these configurations:
Enable Debug Mode: Helps in identifying PHP errors.
Use Version Control (e.g., Git): Keeps your changes tracked and manageable.
Database Access: Tools like phpMyAdmin help manage your WordPress database locally.
If your project requires dynamic functionality, leveraging PHP Development Services during the setup phase can ensure custom features are implemented correctly from the beginning.
Step 4: Customize Themes and Plugins Safely
With your local environment set up, now's the time to begin theme development or customization. You can safely create or modify a child theme, experiment with new plugins, and write custom code without any risk of affecting your live site.
For those unfamiliar with theme structures or WordPress standards, it’s often wise to hire a professional WordPress developer who understands best practices and can ensure clean, maintainable code.
Step 5: Syncing to a Live Server
After building and testing your site locally, you'll eventually want to push it live. Popular methods include:
Using a plugin like Duplicator or All-in-One WP Migration
Manual migration via FTP and phpMyAdmin
Using version-controlled deployment tools
Syncing should always be done carefully to avoid overwriting crucial data. Regular backups and testing are essential.
Step 6: Maintain Your WordPress Site Post-Launch
Launching your website is only the beginning. Ongoing updates, security patches, and performance optimization are critical for long-term success. Enlisting website maintenance services ensures your site remains fast, secure, and up-to-date.
Services can include:
Core, plugin, and theme updates
Malware scans and security hardening
Site performance monitoring
Regular backups
Final Thoughts
A local WordPress development environment not only speeds up your development process but also protects your live website from unintended changes and errors. With tools and strategies now more accessible than ever, there's no reason not to use one.From learning the basics to running advanced builds, setting up locally gives you the confidence and space to grow your WordPress skills. And if you want to see real-world examples or follow along with tips and tricks I share, feel free to check out my work on Instagram for practical inspiration.
0 notes
Text
Fixing WordPress Update Issues Made Easy: A Beginner’s Guide to Smooth Website Maintenance

Keeping your WordPress website updated is one of the smartest things you can do for better security, performance, and features. But what happens when those updates don’t go as planned?
If you’ve ever seen your website freeze, crash, or show strange errors after clicking "Update," don’t worry—you’re not alone, and you don’t need to be a developer to fix it.
In this guide, we’ll explain why WordPress updates fail and share simple, beginner-friendly solutions to get your website back on track—quickly and safely.
⚠️ Common Reasons Why WordPress Updates Fail
WordPress is built on multiple moving parts—your core WordPress files, themes, and plugins. An update may fail if just one part doesn’t play nicely with the others.
Here are the top reasons why updates might not go through:
🌐 Weak or unstable internet connection
🔌 Plugin conflicts that interfere with the update
🎨 Themes that aren’t compatible with the latest WordPress version
🧠 Low server memory or execution time limits
🔒 Incorrect folder or file permissions
📁 Corrupted or incomplete update downloads
🛠️ Simple Fixes for WordPress Update Problems
✅ Step 1: Always Back Up Your Website
Before making any changes, install a backup plugin like UpdraftPlus or BackupBuddy and save a complete version of your site. This ensures that if something goes wrong, you can restore your site in minutes.
✅ Step 2: Clear Your Cache
Sometimes, the issue isn’t with the update—it’s with what your browser is showing.
Clear your browser cache (Ctrl+Shift+R or Command+Shift+R)
If you use a caching plugin (like WP Super Cache or W3 Total Cache), clear your site’s cache from the plugin dashboard
Then, try the update again.
✅ Step 3: Troubleshoot Plugin Conflicts
If an update causes your site to break, the issue might be a plugin.
Here’s how to find out:
Install the Health Check & Troubleshooting plugin.
Enable “Troubleshooting Mode”—this temporarily disables all plugins for you only.
Try running the update again.
If the update works now, reactivate your plugins one at a time. The one that breaks the update is your troublemaker.
✅ Step 4: Check Hosting Limits
Your hosting environment might be too limited for updates to complete properly.
Ask your hosting provider these questions:
Is my PHP memory limit at least 256MB?
Is my maximum execution time at least 300 seconds?
Can these settings be increased if needed?
If not, consider upgrading to a better hosting plan for smoother WordPress performance.
✅ Step 5: Perform a Manual WordPress Update
When automatic updates fail, a manual update is a reliable workaround:
Download the latest WordPress version from WordPress.org
Unzip the files on your computer
Use FTP software (like FileZilla) to access your site files
Replace the wp-admin and wp-includes folders with the new versions
Leave the wp-content folder as-is (it holds your themes and plugins)
Open your site and follow any update prompts for the database
This process ensures a clean, fresh installation—without losing content or settings.
✅ Step 6: Fix File Permissions
Improper file permissions can block updates.
Use a plugin like WP File Manager or ask your host to set:
All folders to 755
All files to 644
These settings help WordPress update safely without risking your site’s security.
✅ Step 7: Remove Stuck Maintenance Mode
If you see the message:
“Briefly unavailable for scheduled maintenance. Check back in a minute.” …your site update was interrupted and left in maintenance mode.
Here’s how to fix it:
Access your site files through FTP or your hosting file manager (like cPanel)
Go to your website’s root folder
Delete the file called .maintenance
Refresh your site—it should be back to normal
This takes less than a minute and often solves the issue instantly.
💡 When to Call in the Pros
If these solutions don’t work—or if you feel unsure about any step—don’t hesitate to get help from professionals.
Here are your options:
Contact your web hosting support
Hire a trusted WordPress expert
Reach out to a reputable company like Websenor for quick, affordable help
🎯 Final Word: Let Websenor Handle Your WordPress Maintenance
WordPress update problems are common—but they don’t have to be stressful. With some basic know-how and a methodical approach, you can often fix these issues yourself.
But if you'd rather skip the hassle, Websenor is here to help. Our team specializes in:
WordPress core and plugin updates
Website backups and security
Speed optimization and error fixes
We'll keep your website running smoothly, so you can focus on your business, not your backend.
👉 Ready to stop worrying about WordPress updates? Contact Websenor today and let us take care of everything behind the scenes.
0 notes
Text
How to Add Custom Fonts to Your WordPress Website

Wondering how to add fonts to WordPress to make your site look more personalized? Changing the font on your site can breathe new life into your design and create a more cohesive brand image. If you’re looking for a step-by-step guide on how to change font on WordPress, you can find it in this comprehensive post that covers all the essential methods.
Why Changing Fonts in WordPress is Important
What’s the point of changing the Font on WordPress? Fonts help create a unique voice for your website, which can influence how visitors perceive your brand. The right font choice can improve readability and keep users engaged with your content for longer periods. Learning how to add fonts to WordPress will allow you to customize your site to match your brand's personality.
How to Add Fonts to WordPress: The Options
Here are the top ways to add new fonts:
Using a Plugin
Popular plugins like Font Awesome or Custom Fonts can simplify the process. Once installed and activated, these plugins allow you to select and use new fonts without writing any code.
Manual Font Upload via FTP
If you prefer to work directly with your theme files, download your desired fonts and upload them to your site’s /fonts/ folder using an FTP client. After uploading, modify the style.css file to implement the font across your site.
For users working with Elementor, knowing how to change font in WordPress Elementor will allow you to fully utilize this popular page builder’s capabilities.
Changing Fonts in Elementor
Follow these steps to change fonts in Elementor:
Open the Elementor editor for your page.
Select the text you want to update.
Under the Style tab, adjust the Typography settings to choose your new font.
Make any additional style changes as needed.
Conclusion
Adding new fonts to WordPress is a fantastic way to make your website more visually appealing. Whether you choose to use a plugin or manually upload fonts, knowing how to add fonts to WordPress will give you greater control over your site’s appearance. For further customization, don’t forget to explore how to change font on WordPress and ensure your typography aligns perfectly with your brand.
0 notes
Text
From Code to Content: How to Convert Your HTML Website into a WordPress Blog
Are you tired of your static HTML website? It can feel like a digital relic in today’s fast-paced online world. If you're looking to breathe new life into your site, converting it to WordPress could be the answer you've been searching for. With its user-friendly interface and powerful features, WordPress offers an incredible platform for creating dynamic content and engaging with your audience. Imagine having the ability to easily add blog posts, customize designs, and enhance functionality without needing extensive coding knowledge. The good news is that transitioning from HTML to WordPress doesn’t have to be daunting. In fact, it's a straightforward process that opens up endless possibilities for growth and creativity. Let’s explore the benefits of making this switch and guide you through each step in transforming your static website into a vibrant WordPress blog!
Understanding the Benefits of Converting to WordPress
Converting to WordPress unlocks a world of flexibility. Unlike static HTML sites, WordPress allows you to easily update content without any coding skills. This means you can focus on what really matters—your message. The extensive library of themes and plugins enhances your website’s functionality effortlessly. Whether it's adding social media sharing buttons or optimizing for search engines, there’s a tool for every need. User engagement soars with features like comments and forums, allowing your audience to interact directly. Building a community around your blog becomes much simpler. Moreover, the SEO capabilities of WordPress are robust. With built-in tools and plugins designed for optimization, reaching your target audience becomes more achievable than ever before. Regular updates from the WordPress team ensure security and performance improvements over time. You’ll have peace of mind knowing that you’re using one of the most secure platforms available today.
Step-by-Step Guide to Converting HTML to WordPress
Converting your HTML website to WordPress might sound daunting, but it's easier than you think. Start by backing up your current site. This ensures that all of your hard work is safe. Next, set up a fresh WordPress installation. Many hosting providers offer one-click installations, making this step seamless. Once WordPress is ready, it’s time to create a custom theme. You can either build one from scratch or modify an existing template to suit your needs. After designing the theme, upload the necessary files via FTP or through the WordPress dashboard. Remember to include stylesheets and scripts for proper functionality. Now comes content migration. Copy and paste text from your HTML pages into new posts or pages in WordPress. Don’t forget about images; upload them directly within the media library for easy access. Tweak settings like permalinks and menus so everything flows smoothly on your new platform.
Choosing a Theme and Customizing Your Blog Design
Selecting a theme is one of the most exciting parts of transitioning to WordPress. With thousands of options available, you can find a design that aligns perfectly with your brand and vision. Look for themes that are responsive, ensuring they look great on all devices. A clean layout enhances user experience and keeps visitors engaged. Customization is where you can truly make the theme your own. Use the built-in customizer to adjust colors, fonts, and layouts easily. Incorporate your logo for brand consistency. Don’t forget about functionality! Choose plugins that enhance usability without cluttering your site. Simple navigation helps guide visitors seamlessly through your content. Consider accessibility features in your design choices. An inclusive site welcomes a broader audience while improving overall engagement levels.
Importing Content from Your HTML Site to WordPress
Transferring content from your HTML website to WordPress can seem daunting. However, it doesn't have to be an overwhelming task. Start by manually copying and pasting text from your old site into the WordPress editor. This method allows you to clean up any formatting issues as you go along. For larger sites, consider using plugins like “HTML Import 2.” These tools can automate the process, importing multiple pages at once while preserving elements such as images and links. Make sure to optimize each post for SEO during this transition. Update meta descriptions and titles for better visibility in search results. Don’t forget about media files! Upload images separately through the WordPress media library for optimal performance. As you import, take time to review your content strategy too. Ensure that everything aligns with your new goals on the platform.
SEO Considerations for the Conversion Process
When converting your HTML website to WordPress, SEO should be at the forefront of your strategy. Start by setting up 301 redirects from your old URLs to the new ones. This helps maintain search engine rankings and ensures visitors find their way to the right content. Next, optimize metadata during the transition. Titles, descriptions, and alt tags are essential for both user experience and search visibility. Make sure each post retains its relevant keywords. Utilizing SEO plugins like Yoast or All in One SEO can streamline this process significantly. They offer tools that guide you through optimizing every aspect of your site. Don't forget about mobile responsiveness too; a significant factor in ranking well on Google today is ensuring that your site looks great on all devices. Implementing these considerations will set a solid foundation for better online performance as you make the switch.
Best Practices for Maintaining and Updating Your WordPress Blog
Regular updates are crucial for your WordPress blog. This includes the core software, themes, and plugins. Keeping everything updated helps maintain security and performance. Back up your content frequently. Use reliable backup solutions to ensure that you can restore your site if something goes wrong. A little preparation can save a lot of headaches. Engage with your audience by responding to comments promptly. Building a community fosters loyalty and encourages more interaction on your posts. Monitor website speed using tools like Google PageSpeed Insights or GTmetrix. Slow loading times can turn visitors away, so optimizing images and minimizing code is essential. Analyze traffic regularly through Google Analytics or similar platforms. Understanding visitor behavior helps in refining content strategy and improving user experience over time.
Conclusion
Transitioning from an HTML website to a WordPress blog can seem daunting at first, but the rewards are plentiful. You gain improved user experience, easier content management, and enhanced SEO capabilities. By following the outlined steps—understanding benefits, executing a thorough conversion plan, choosing an appealing theme, importing your existing content smoothly, and considering SEO—you set yourself up for success. Maintaining your new WordPress blog is equally important. Regular updates keep both security measures strong and content fresh. Engage with your audience through comments and social media integration while keeping an eye on analytics to refine your strategy over time. Your journey from code to content opens doors to creativity and connection in ways that static HTML simply can't match. Embrace this change as you build a vibrant online presence that resonates with visitors and fuels growth for years to come.
0 notes
Text
How to Fix "WordPress JQuery is Not Defined" Error?

Today, approximately 80% of websites run on jQuery, if your wordpress website is one of them, you might encounter the “Uncaught ReferenceError: jQuery is not defined” error at some point. This error message indicates that your website can’t call a function from the jQuery JavaScript library. This may cause one or multiple website elements to stop running. Luckily there are multiple methods to fix this common issue.
In this comprehensive tutorial, we will go through the methods to do so for WordPress users.
What Is the “jQuery Is Not Defined” Error in Wordpress?
“jQuery is not defined” error in wordpress is a common error that occurs when a website calls for a jQuery function before the library loads properly but the jQuery.com JavaScript library is unavailable or isn’t functioning correctly. It is caused possibly due to conflicting plugins, a corrupted jQuery file, a blocked CDN, or your JavaScript code loads incorrectly.”
It can crash your wordpress website because of corrupted WordPress’s plugins or jQuery files, hosting issues, or CDN problems. Simply, your website can’t communicate with its library because of broken or conflicting code.
Key Reasons of the “jQuery Is Not Defined Error”
This error in WordPress is pretty common. Here are some key reasons of this issue:
Corrupted WP Themes or Plugins
Errors with JavaScript or jQuery file
JavaScript Running Incorrectly
Blocked CDN-hosted jQuery
Poor Performing Host
What are Negative Impacts of this Error on Website?
A "jQuery is Not Defined" error in WordPress can impose some negative effects on your website's functionality and user experience:
Broken Functionality of Site
Affects User Experience
Increased Bounce Rate
Negative Impact on SEO
Loss of Revenue
Loss of Brand Value
Damage Site Authority
How To Fix the “Uncaught Reference Error: jQuery Is Not Defined” WordPress Error
Before starting fixing the error, create a site backup if something goes wrong. Setting automated backups is recommended. Beyond this, we also recommend running any changes you make to your site through a staging environment. Don’t make any changes to your live website while troubleshooting. Finally, ensure you have access to an FTP or File Transfer Protocol client. This program helps you edit code behind the scenes, and you can get login details from your host.
Remember, if you don’t have the time to fix this error yourself or if you should just prefer expert support, you can skip ahead and contact Supportfly.
1. Check jQuery is Included
Firstly, check that your website code includes a jQuery library. WordPress typically installs this for you. Right-click anywhere on your web page and select “View Page Source” to open the source code.
Now find the code that makes up your page. From here, press CTRL+F on Windows or CMD+F keys on Mac to open a search bar.
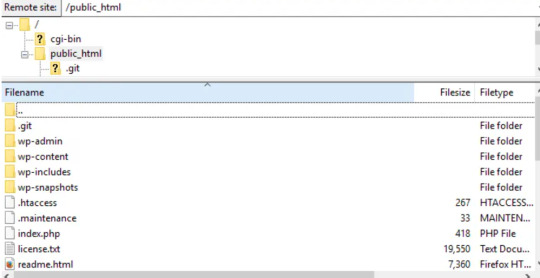
Search for “jquery.min.js.” The phrase should appear in the code if your website has a library installed. If it doesn’t appear, check the Network tab of your browser’s dev tools to see if you notice any jQuery takes being loaded. In your root folder, typically in “public_html,” look for a folder called “wp-includes”.
Open “wp-includes” and then open the file named “script-loader.php.” Now in the source code, search for a line that starts with “wp_enqueue_script.” and after the word “script” in this phrase paste the below given bold lines-
wp_enqueue_script( ‘tt-mobile-menu’, get_template_directory_uri() .
‘/js/mobile-menu.js’, array(‘jquery’), ‘1.0’, true );
In WordPress you can do this all using Plugin. You can add code to your site using this plugin without editing text files.
Go back to your website and see if the problem is resolved.
2. Check jQuery is loading correctly
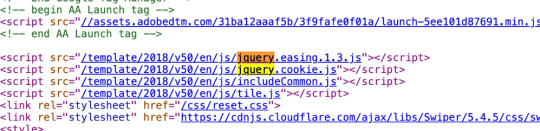
Now, we need to check, jQuery file is loading as expected. To start, right-click anywhere on your web page and select “View Page Source.” and search for queries in the code that start with “<script src=” and include “jquery” in the same lines.
If you see lines in the code matching this description, it’s likely loading correctly. Now move to the next step if you can’t see any matches.
3. Add a snippet to wp-config.php File
Still, if the above given ways don't work, you need to edit your website’s configurations. Look for the wp-config.php file in your root folder.
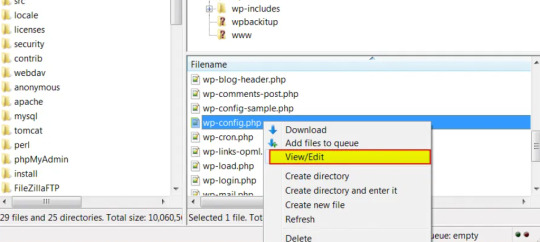
Right-click on the webpage anywhere and download the file to your preferred drive so you have a manual backup, and open the file in your root folder to begin editing.
Now, find the following line:
/* That’s all, stop editing! Happy blogging. */
Paste the following above that line:
/** Absolute path to the WordPress directory. */
if ( !defined(‘ABSPATH’) )
define(‘ABSPATH’, dirname(__FILE__) . ‘/’);
define(‘CONCATENATE_SCRIPTS’, false);
You just defined the ABSPATH, which will help your website to recognize that jQuery is cavailable. Save the file and try to reload your website.
4. Set up Google-hosted jQuery with an alternate fallback
A CDN, or Content Delivery Network, might be to blame for your jQuery woes. This is a series of networked servers that speed up WordPress but can sometimes cause functionality issues if it goes down unexpectedly. So, it’s worth setting up a Google-based jQuery you can fall back on now and in the future. To do this, you add the following code:
// Fall back to a local copy of jQuery if the CDN fails
<script>
window.jQuery||document.write(‘<script src=”mysite.com/wp-content/themes/my_theme/js/query.min.js”><\script>’))
</script>
Save, and check your site once again.
5. Manually add the jQuery Library to header.php
If step four didn’t resolve the error, try adding the jQuery library manually. Head to Google Hosted Libraries. Here, copy the code snippet for the latest version of jQuery from the link above, for example, the snippet listed under “3.x snippet.”:
<script src=”https://ajax.googleapis.com/ajax/libs/jquery/3.7.1/jquery.min.js”></script>
Now, find the marked folder “wp-content” in your root folder “public_html”, then go to the “Themes”, then the folder marked with the name of the theme you’re using.
In this theme folder, you should see the header.php file. Right-click and save this to your usual drive, and open the version in FTP. Then, paste the snippet below the tag marked, save, and try to re-access your site.
Conclusion
In conclusion, jQuery is one of the most common errors occurring in wordpress sites. In this tutorial we have explained about what “jQuery is not defined” is, some of the key reasons for this error and some methods of fixing this error that will definitely help you to fix this error. Nevertheless you are not able to resolve the "jQuery is Not Defined" error in WordPress. It can extend the time your visitors have to wait for your WordPress page to load. Fortunately, with some code editing, fixing the WordPress admin jQuery error is simpler than you might expect.
Muddling around with code may be a bit daunting, especially if you need to make changes to your theme’s functions.php file. So if you’re unsure about making potentially harmful changes to your site, it’s best to contact a wordpress expert.
Contact Supportfly and hire an expert team for WordPress Management services to boost your website performance. We provide Premier Wordpress Management services to run your website on WordPress successfully.
0 notes
Text
Are you looking for a cost-effective yet secure web hosting service for your blogs or websites? Look no further because Hostinger’s shared hosting service may be just what you need! Let’s dive right in and see why Hostinger is becoming a popular choice for small businesses and individuals alike. Hostinger’s web hosting service is simple to use and offers a wide range of features at an affordable price. Introduction to Hostinger GO TO HOSTINGER! Hostinger Hostinger's web hosting service is a great way to get started with web hosting. It's affordable, starting at just $2.99 a month, and comes with lots of features like free domain names and SSL certificates. Plus, you get access to professional email accounts, automated backups, and 99.9% uptime assurance. And if you need help migrating other control panels, like WordPress hosting, cPanel, and FTP, their support staff can help. One of the best things about Hostinger's service is that you can get your money back within 30 days. That's why they have an enviable reputation among web hosting companies for their customer service and reliability. GO TO HOSTINGER! This commitment to customer service and dependability has earned Hostinger’s place among the top web hosting companies in the market. It’s important to note that hosting services offered by Hostinger have resource limitations. However, considering the price point and the target audience, these limitations are acceptable and should not be a problem for most users. In summary, Hostinger shared web hosting is affordable, has a wide range of features, and is easy to use. It’s designed for small businesses and people looking to build their online presence with a dependable internet hosting service that won’t break the bank. GO TO HOSTINGER! Who is Hostinger's web hosting For? Hostinger’s web hosting service is perfect for small businesses and those just starting their online journey. The plans include free custom domains and SSL certificates along with professional email accounts and automatic backups. The main benefit of hosting with Hostinger is its cost-effectiveness. Starting at just 2.99 per month, it comes with everything you need to grow your small-business blog or website without spending a fortune. Moreover, Hostinger offers more resources than any other hosting provider, and they also offer the most expensive packages. When comparing Hostinger to other hosting companies, it’s important to consider the features they offer as well as the speed they offer. With its user-friendly interface, wide range of features, and excellent customer service, Hostinger is one of the top choices in the hosting on a budget market. All in all, if you’re looking for an affordable and easy to install web hosting solution, you’ve come to the right place. GO TO HOSTINGER! Setup Your Website with Hostinger's Web Hosting Starting with Hostinger’s Web hosting is easy. You’ll be asked to fill out a short questionnaire, which allows Hostinger to automatically configure LiteSpeed’s caching to meet your specific needs. Then, you’ll be led through the installation of WordPress, where you’ll need to provide the administrator’s email address and password. If you’d like, you can choose a theme to begin your site’s style. During the setup process, you can add your domain name, extension, and data center to your Hostinger hosting service. If your domain already exists, you can easily connect it to Hostinger by copying its name server details to the domain panel. Hostinger also offers a free-to-use site builder, called Hostinger website Builder. This tool allows you to create a website without any technical knowledge using a simple drag and drop interface. Alternatively, you can use the auto Installer of Hostinger to quickly and easily install over 100 applications, including: WordPress Joomla Drupal databases Database management applications Database management application messages boards When you're
getting started, it's a good idea to test out your setup and make sure you have the right security measures in place. With Hostinger's help, you can get all the help you need, from their wizard to live chat support. Plus, if you're a WordPress user, you can use their staging tool to experiment with different content types and layouts that you can upload whenever you want. GO TO HOSTINGER! Navigating the Control Panel Hostinger’s hosting control panel, “hPanel” was designed to be easy to use and practical. It’s compatible with the popular cPanel. You’ll find server information and IP address on the right-hand sidebar. Colorful icons help you organize different features into easy-to-understand categories such as domains, emails, files and WordPress. H-Panel’s main purpose is to manage your e-mail accounts, website and other aspects of your hosting services. You can quickly and easily access the WordPress login process File Manager, login process and platform is available in 15+ languages. Hostinger’s hPanel offers a wide range of features, including: Automated installations DNS zone configuration FTP management and hosting MySQL databases Hostinger File Manager Monitor disk storage/ bandwidth domain parking Software installations such as WordPress and Joomla. In summary, Hostinger’s control panel was created to provide a user-friendly experience that makes hosting and website services easy to manage. With its user-friendly interface and a wide range of features, hPanel is an excellent tool for managing your online presence. Exploring Hostinger's Features Hostinger’s web hosting offers a wide range of features to ensure your web hosting journey is as smooth and efficient as possible. One of the key benefits of hosting with Hostinger is that you can get absolutely free SSL certificates that allow you to use unlimited SSL certificates on every domain you host. SSL certificates protect your visitor information, giving you extra security and peace of mind for your website . Another important feature of Hostinger’s Web hosting is its automatic weekly backups, which ensure the safe storage of your files and databases, providing you with the peace of mind that your data is safe and can be recovered in the event of any issues. Hosting a single site is a standard feature of most Hostinger web hosting plans, making it a great choice for small businesses and those just starting out online and don’t need multiple sites. Hostinger’s web hosting service provides a wide range of features and resources. It’s important to note that there are limitations to the single web hosting plans offered by Hostinger. These limitations are mainly related to the resources available and can affect how your site handles unexpected spikes in traffic or resource usage. Hostinger also provides VPS hosting plans for those looking for more advanced features. These plans include a dedicated IP address for DDoS protection and automated backups for enhanced security. All in all, Hostinger offers a wide range of web hosting features that can meet the needs of small-scale bloggers, business owners, and anyone looking to build an online profile. Evaluating Hostinger's Performance Hostinger’s web hosting is known for its fast loading times and high uptime rate. We tested the Hostinger web hosting service and found average loading times to be 0.8 second, and uptime rates to be 100% for a month. This ensures that your visitors can visit your site anytime, without any delays. When it comes to handling spikes in traffic, Hostinger’s hosting service is able to handle up to 15 concurrent requests. This means that your website can handle sudden spikes in traffic and provide your customers with an enjoyable experience. Time to First Byte is another important performance measure. It measures how long it takes for a server to send out the first piece of data in response to a request. The average TTFB for a shared hosting plan is around 0.2 second, and our tests showed that servers average TTFB to be 382 milliseconds.
With Hostinger's fast response time, you can be sure that your website will stay up and running even when there's a lot of traffic. Plus, they guarantee that your website will be up and running all day long - 99.9% uptime! If Hostinger doesn't stick to their promise, they'll give you a 5% refund. With great performance at a reasonable price, Hostinger is a great choice for both small businesses and people looking for reliable and fast web hosting. Performance and Analysis of Uptime With Hostinger’s web hosting services, you can rest easy knowing that your site is running at peak performance. Our tests show that loading times are about 1-second for Europe, South America, Singapore and Australia, and about 2 seconds for the rest of the world. This fast loading time ensures that users have a smooth and enjoyable experience when visiting your website, no matter where they are in the world. Our server response times are also impressive, with an average response time that’s 382 milliseconds on average. This fast response time helps to improve your site’s efficiency and stability, and ensures that your site is always available, even when there’s a lot of demand on your site. GO TO HOSTINGER! With a 99.9 uptime guarantee, you can rest assured that your site will be up and running at all times. We’ve seen an unbeatable track record of 100 percent uptime in the last 8 weeks of watching, which means you won’t have to worry about lost revenue or disappointed customers. It’s important to note that this uptime guarantee aligns with other budget-friendly hosts that may have lower levels of generosity than others. The high speed and uptime of Hostinger’s web hosting service makes your website accessible and responsive for visitors from all over the globe. Hostinger’s high performance combined with its low cost and comprehensive plans make it an attractive choice for small businesses and people seeking reliable Hostinger web hosting services. Safety Measures in Backups and Security Measures Security is the number one priority for any website. Hostinger’s web hosting service recognizes this and provides a range of security measures to protect your site from attack and data loss. One of these measures is the provision of free SSL certificates which protect your website’s visitor information and helps protect your site from data breaches. Hostinger’s in-house-developed web application firewall and automated malware scanner help protect your site from malicious attacks. Hostinger offers DDoS protection for the hosts’ nameservers, so you can rest assured that your site will be safe even in the face of a massive DDoS attack. It’s important to have regular backups to protect your site’s data and ensure that it is restored quickly in case of any issues or lost data. When you look at the security tools offered by Hostinger compared to other budget hosts, it’s clear that Hostinger offers a more advanced security suite. These steps will keep your site secure and free from threats, giving you peace of mind as you grow your web presence In addition to these security measures, Hostinger’s hosting service also includes automatic WordPress and security upgrades. This keeps your website up-to-date and safe from the latest vulnerabilities. All in all, hostinger’s web hosting service provides a complete security solution and backup options to keep your site safe and free from threats and data loss. All of these features, combined with outstanding performance and affordable pricing, make Hostinger hosting the best choice for those looking for the most reliable and secure web hosting service. Is Hostinger's web hosting Worth It? Do you think Hostinger’s web hosting is worth the price? We think it’s a great value for money in terms of features, performance and price. It’s an efficient and fast web hosting service at affordable prices that’s perfect for small businesses and those looking to grow their online presence.
It’s important to consider your needs and requirements when evaluating the Hostinger option to decide if it’s the right choice for you. If you need support via phone, there are alternative web hosting providers that you can look into. For example, DreamHost offers a 97-day money-back guarantee compared to the 30-day guarantee offered by Hostinger. You can also check out the hostgator gator website builder that’s offered for free. All in all, Hostinger is a great choice if you’re looking for an affordable yet top-of-the-line web hosting solution. With its outstanding efficiency, easy-to-use design and a wide variety of security options, it’s an excellent choice in the affordable web hosting market. Conclusion Hostinger is a great web hosting service that's affordable and easy to use. It's perfect for small businesses and anyone looking to get an online presence. It's got great performance, lots of features, and great customer support. Plus, it's easy to set up and has a control panel with lots of features. It's also got strong security and backup options so you don't have to worry about risks or data loss. But before you make a final decision, it's a good idea to check out other web hosting options. You can find out which one is best for you by comparing costs, features, and performance. As you start your journey online, we hope that this Hostinger web hosting review has given you all the information you need to make an informed decision about which web hosting option is right for you. Good luck and happy hosting!
0 notes
Text
Create Backup of Wordpress Site
Most of the websites are running on WordPress & and the reason behind this is smoothness & ease of understanding. When we are thinking of creating a backup of WordPress files, it is a huge & complicated task. WordPress is not as secure as other websites like Shopify are & cause of this WordPress hack & other data loss issues. In this blog, we will explain How to Create a Backup of WordPress sites.

Here, we have written about the ways to create a backup of WordPress sites for free in simple steps. You can use these backup files to get the website back as it is. This backup contains the WordPress themes, plugins, media files, databases Database & all other data. If you have created a website where you have uploaded 1000+ Attitude Shayari for Boys & if you want to take backup all of them. Create a backup of WordPress, and all the Attitude Shayari will be saved in the backup & they can be uploaded to your new site as it is.
In this blog, we have covered all the key points you should keep in mind while backing up the data.
Methods of Creating Backup –
As we know, backing up the data is a very good practice for protecting websites & data as well. So, there are various methods available for backing up the data; you can choose any of them.
Create Backup Through Plugin –
WordPress is all about the plugins. This means if you want to make any changes or add anything to the website, you can do that with plugins. Likewise, the backup process can be performed through plugins available in WordPress & most of which are free to use, such as BlogVault, BackWup, updraftplus& many others.
In this tutorial on pastenow, we have explained how to create a WordPress backup through updraftplus. It is a very popular & recommended plugin used by millions of users with great reviews.
Create Backup Through UpdraftPlus –
To create a backup through this plugin, you should install it on your WordPress site. To install the plugin in WordPress –
Go to Plugins & then click on the Add New button on the top side of the Plugins page.
Where you will see the list of plugins & a search box to search the desired plugin & search for updraftplus.
Click on the Install Now button once you will see the plugin in the list.
Once it is installed in your WordPress, it will ask you to activate it.
Once it gets active, you can see the updraft plus at the top of your WordPress site. Move your cursor on it & a dropdown will be there. Click on the Backup / Restore.
A dedicated dashboard of the plugin will be an option with multiple options in tabs. You will see the direct Backup button & you should click on it to create a backup of WordPress.
This backup will be saved for your future to restore your data without any data loss. It is very secure to protect your data and is cost-efficient as well.
Create a Backup of WordPress Manually –
If you do not want to invest in plugins, you can create a local backup on your computer for your website. You should follow some simple steps & they all are the same for the website. Here are the top five sites to buy domains: Namecheap, Hostinger& three more.
To Create a backup of the WordPress site, you have to create two backup files. The first is for WordPress Files & second is for Database. So, follow the step-by-step guide to make both backup files for future restoration.
Backup WordPress files via FTP Client –
First of all, you should go to the domain section of your hosting website, where your website is hosted.
You should go to your website cPanel & look for File Manager.
Click on it & you will reach the WordPress Files like Themes, media files, pages, login details & other files stored.
You should select all the files here & move them into a new folder.
Now compress the newly created folder into a zip file.
Now, download this file to your computer as a backup file of your WordPress files.
Backup WordPress Database –
In this step, you have to create a backup of the Database of your WordPress website. Here are the steps –
Go to your website, cPanel, through your hosting website.
Here, you will see the PHP database & click on it.
Where you will see the database name you have created at the time of installing your website.
Click on the database name & all the database files will display on the screen.
Now select all the files & export the Database in SQL format to your computer.
It is the database file of your WordPress site & it will contain all the table content & additional codes of your website.
Here
1 note
·
View note
Text
[solved] WordPress asking for my FTP credentials to install plugins
[solved] WordPress asking for my FTP credentials to install plugins
WordPress is a popular content management system (CMS) that allows users to create and manage their website easily. It is an excellent platform for people who want to have an online presence without any coding knowledge. However, sometimes you may find that WordPress asks you to enter your FTP credentials to install certain plugins or themes. This issue usually occurs when WordPress cannot write…
View On WordPress
0 notes
Link
#WebsiteMaintenance#WordPress#WordPressmanagement#WordPressoptimization#WordPressperformance#WordPresssecurity#WordPresssupport#WordPressupdates
0 notes
Text
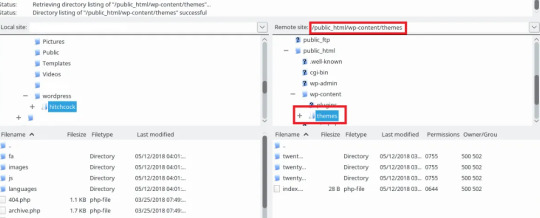
How to install WordPress Theme 2021
How to install WordPress Theme 2021
How to install WordPress Theme How to install Word install WordPress Theme install WordPress Theme Press Theme So hunt up and down and get the perfect WordPress theme. Now you need to know how to install WordPress theme or it will just be a nice file that collects dust on your hard drive. Installing a WordPress theme is not a problem as many people think it is. The thing that often confuses…

View On WordPress
#How to install WordPress Theme So hunt up and down and get the perfect WordPress theme. Now you need to know how to install WordPress theme#install wordpress theme#install wordpress theme in cpanel#install wordpress theme in xampp#install wordpress theme localhost#install wordpress theme manually#install wordpress theme ubuntu#install wordpress theme without ftp
0 notes
Text
Rawal Nulled Script 1.1.9

Unlock Premium Features with the Rawal Nulled Script – Download for Free Experience the power of advanced eCommerce functionality with the Rawal Nulled Script, a feature-rich and beautifully designed Laravel-based web solution. Whether you're launching a new online store or upgrading your existing platform, this script delivers unmatched performance and customization options—without the hefty price tag. Now available for free download from our website, this nulled version lets you take full advantage of premium features without limitations. What Is the Rawal Nulled Script? The Rawal Nulled Script is a universal Laravel eCommerce platform equipped with multiple themes, a powerful admin panel, and a fully responsive front-end. Built to provide maximum flexibility, it’s perfect for businesses of all sizes. This nulled version has all premium functionalities unlocked—making it an excellent choice for developers and entrepreneurs who want to create stunning online stores without recurring costs. Technical Specifications Framework: Laravel 8+ Database: MySQL Language Support: Multi-language compatibility Responsive: Mobile, tablet, and desktop optimized Admin Panel: Advanced CMS with complete store control Key Features and Benefits The Rawal Nulled Script offers a wide range of features that ensure a high-quality user and admin experience. Here are some of the highlights: Multi-theme Support: Customize your store look instantly with various included templates. Advanced CMS: Control every element of your site from an intuitive admin dashboard. SEO-Ready: Built with SEO best practices to help your store rank higher on search engines. Secure & Scalable: Laravel ensures robust performance and scalability for growing stores. Integrated Payment Gateways: Offer a seamless checkout experience with built-in payment options. Inventory Management: Track, manage, and organize products effortlessly. Who Should Use the Rawal Nulled Script? This script is ideal for: Startups and Entrepreneurs: Launch a full-featured online store without high development costs. Web Developers: Customize and deploy advanced eCommerce platforms for clients quickly. Agencies: Deliver multiple online store solutions using one flexible and powerful script. Easy Installation Guide Setting up the Rawal Nulled Script is quick and simple: Download the script package from our site. Upload the files to your hosting server using FTP or File Manager. Set up the database and run the installation wizard. Log in to the admin panel and start customizing your store. No technical skills? No problem! The user-friendly interface ensures that anyone can get their store up and running in minutes. Frequently Asked Questions (FAQs) Is the Rawal Nulled Script safe to use? Yes. We ensure all scripts are tested and verified for performance and security. However, always use secure hosting and maintain regular backups. Can I use it on multiple domains? Absolutely! Since it's a nulled version, you're free to use it across multiple projects without license restrictions. Are future updates available? We regularly update our collection. Stay tuned to our site for the latest versions and enhancements. Will I get support for this script? While official support isn't available for nulled scripts, we provide basic installation guidance and community-driven help via our blog and forums. Why Download from Us? We specialize in offering top-tier WordPress and Laravel resources for free. From themes to scripts like the Rawal Nulled Script, we provide clean, working files that are safe and reliable. Whether you're interested in unlocking the potential of the betheme nulled or exploring premium WordPress tools, we’ve got you covered. For more high-end WordPress solutions, don’t miss the kallyas NULLED—another excellent tool to elevate your digital projects. Conclusion If you're serious about launching a high-quality eCommerce store, the Rawal Nulled Script is your gateway to premium features without the premium price.
Download it today from our site and start building your online empire effortlessly. Power, flexibility, and savings—all bundled in one professional-grade script.
0 notes
Text
Best WordPress Plugins Essential for Professional
WordPress is one of the best CMS platform for any kind of business. There are more than Fifty thousands of plugins available on WordPress. Therefore, it's quite difficult to choose which plugin is the best for your website.
It doesn't matter what kind of website you’re running, there are many useful plugins available that will help to boost your website performance and help to optimise your website.
So let's take a look at the list of best WordPress plugins essential for professional.
1) Yoast SEO - For boost your website SEO
Yoast very popular and No 1 SEO WordPress plugin. It is widely popular because it is easy to use and guides users through the step-by-step process of optimizing their website content. It can even analyze your content’s readability.
From optimizing your titles and heading tags, making sure your target keywords are accurate and increasing the overall readability of your content. Out of all the WordPress SEO plugins, Yoast offers the most comprehensive solution to improve your on-page SEO.
Yoast SEO is packed full of features, designed to help visitors and search engines to get the most out of your website .Yoast helps you add meta tags, generate sitemaps, connect your website to Google Search Console, Analytics and also optimize it for social media.
Since 2008 Yoast SEO has helped millions of websites worldwide to rank higher in search engines.
Get plugin
2) WP Rocket - For boost your website Speed
WP Rocket is the best WordPress caching plugin on the market that helps you to speed up your website's loading time and performance. It automatically turns on gzip compression, page cache, and cache pre-loading.
You can also turn on optional features like lazy loading images, CDN support, DNS pre-fetching, CSS and Java minification, and more to improve page load times.
The most amazing feature of this plugin is it automatically crawls and build your website cache which results in an instant performance boost. For image optimisation, it offers Imagify which is a free. This service will help to speed up your website.
As per our analysis, It decreased page load times by a 63%. However, this plugin is not free but It gives you worthy results for sure.
Get plugin
3) WP Super Cache - For boost your website Speed
One of the easiest ways to boost your website’s speed is by installing and activating WP Super Cache. It doesn’t require you to be an expert to configure it. It’s easy to learn how to set it up.
WP Super Cache creates static HTML files from your dynamic WordPress site, which are lighter and quicker to process than PHP scripts. The web server uses these HTML files that will help your website load quickly and smoothly.
Get Plugin
4) Sucuri - For website Security
Security should be a top priority for all the online businesses. Sucuri is the best WordPress security plugin. If you don’t have a firewall on your website, then you need to add one today because nowadays, hackers can attack on your website through any platform.
Therefore, they monitor and protect your website from DDoS, malware threats, XSS attacks, brute force attacks, and basically every other type of attack. Sucuri block hundreds of thousands of attacks every month on Verz Design & Gotafflair.
Get plugin
5) UpdraftPlus - For Backup Your Data & Information
Hackers and spammers attack is unexpected. You may lose all your website data and information if you are not having any backup. Thanks to UpdraftPlus WordPress Plugin you can save your data. UpdraftPlus is the most popular WordPress backup plugin, allows you to set up automatic backups and safely store them on a remote location like Google Drive, Dropbox, FTP, email, and more.
It is also super easy to restore your website from a backup. Their base plugin is free. For the extra features & priority support they also have a paid plan.
Get plugin
6) Beaver Builder - For page builder
Beaver Builder is a drag and drop page builder that works on the front end of your WordPress website. You can easily build beautiful, responsive WordPress pages in minutes. Without writing single line code, It allows you to customise your web design and create custom page layouts.
Without hiring any web developer, business owners can still create completely custom landing pages within minutes. That’s the reason this plugin is very popular.
Get Plugin
7) Blog Filter - For filter blogs or posts
Blog Filter WordPress Plugin for Blogs or Posts filtering and for showing the blogs and posts in the grid layout to make a blog portfolio showcase. Blog Filter WordPress Plugin main features are posts filtering, category filtering, post grid, and columns layout, responsive, masonry design, show tags, blog author details, two design templates, post meta positioning and hide show, light and dark theme, hover color, five images hover effects, post read more link and more features. Plugin really useful to those blogger who has many blog subscribers and readers and potential visitors traffic on their blog websites.
Get plugin
Conclusion
These plugins are essentials & more than just great additions to your WordPress website. No matter what kind of website you’re running, these certain plugins are always worth installing.
9 notes
·
View notes
Text
WordPress Update Problems? Here’s How to Fix Them (No Tech Skills Needed)

Keeping your WordPress website up to date is critical for security, speed, and access to new features. But let’s face it—when an update fails, it can feel like the whole site is crashing down, especially if you don’t have a technical background.
Don’t panic.
Most WordPress update errors are easy to fix with a bit of guidance. In this beginner-friendly guide, we’ll break down why updates fail and what you can do to resolve them—no developer required.
🛑 Why Do WordPress Updates Fail?
WordPress runs on a system of interconnected parts: the core platform, themes, and plugins. If one of these components doesn’t align properly during an update, things can break.
Here are some of the most common causes:
📡 Poor internet connection that interrupts the update
🔌 Conflicts between plugins
🎨 Theme incompatibility
💾 Insufficient server memory or time limits
🔐 Incorrect file and folder permissions
🧩 Corrupted or incomplete update files
The first step toward fixing any problem is understanding where it’s coming from.
🛠️ How to Fix WordPress Update Errors (Step by Step)
✅ 1. Back Up Your Site First
Before trying anything, create a full backup of your website using a plugin like UpdraftPlus or BackupBuddy. This gives you a safety net in case something goes wrong during the troubleshooting process.
✅ 2. Clear Your Cache (It Might Be That Simple)
Sometimes, your browser or caching plugin is the culprit—not the update itself.
Clear your browser cache (Ctrl+Shift+R or Command+Shift+R on most browsers)
If you use a caching plugin (like WP Super Cache or W3 Total Cache), clear your site cache too
Now try updating WordPress again.
✅ 3. Use Troubleshooting Mode to Find Plugin Conflicts
Conflicting plugins are a frequent reason for failed updates.
You can use the Health Check & Troubleshooting plugin to safely test your site:
Install and activate the plugin
Enable troubleshooting mode—this disables all plugins temporarily (just for you)
Try updating again
If it works, re-enable plugins one by one until the error returns
That last plugin activated is your likely culprit.
✅ 4. Check Your Hosting Settings
Shared hosting plans often limit memory and execution time, which can stop updates mid-process.
Ask your host:
What’s the PHP memory limit? (It should be at least 256MB)
What’s the maximum execution time? (Aim for 300 seconds)
Can they increase these limits for better stability?
Sometimes, simply switching to a better hosting plan solves everything.
✅ 5. Try a Manual WordPress Update
If automatic updates aren’t working, a manual update might do the trick.
Here’s a simple guide:
Download the latest WordPress version from WordPress.org
Unzip the files on your computer
Use FTP software like FileZilla to connect to your website
Replace the wp-admin and wp-includes folders with the new ones
Do not touch the wp-content folder (it holds your themes and plugins)
Open your site—if needed, it will ask to update the database. Just click the button
Done right, this is a safe and effective fix.
✅ 6. Adjust File Permissions (If You’re Getting Permission Errors)
WordPress needs the correct file permissions to update itself.
Use a plugin like WP File Manager or ask your hosting provider to set:
Folders to 755
Files to 644
These permissions allow WordPress to work smoothly without opening security risks.
✅ 7. Stuck in Maintenance Mode? Here’s How to Exit
Sometimes an update gets interrupted, leaving your site stuck in maintenance mode with this message:
“Briefly unavailable for scheduled maintenance. Check back in a minute.”
To fix this:
Log into your hosting account (e.g., cPanel or via FTP)
Go to the root folder of your WordPress site
Delete the file named .maintenance
Refresh your site—it should return to normal
This is one of the easiest fixes on the list.
💬 When You Should Call in the Experts
If you’ve tried everything and the update still won’t work—or if you're unsure about any step—it’s perfectly okay to ask for help.
Here’s who you can turn to:
Your web hosting support team
A WordPress specialist
Or a reliable web development company like Websenor
✅ Final Thoughts: Keep WordPress Simple with Websenor
WordPress update errors can seem intimidating, but most are fixable with a calm, step-by-step approach—even if you're not a tech expert. The key is to:
Back up first
Rule out the simple causes
Test safely before changing live settings
Know when to ask for help
If managing updates or troubleshooting problems ever feels like too much, Websenor is here to take the weight off your shoulders. Our team specializes in WordPress maintenance, bug fixing, and website performance tuning—so you can focus on growing your brand while we handle the backend.
Let Websenor be your WordPress safety net. With us, your website stays secure, updated, and stress-free.
0 notes
Text

Web hosting is a service that allows individuals and companies to publish a webpage or website on the Internet. A service provider or web host is an organization that offers the services and technologies required for the website to be seen on the Internet. Servers are special computers that host or store websites. A space is allocated on a web server for a website to store its files, they are hosting a website. Web hosting makes the files that comprise a website (code, images, etc.) available for viewing online. Every website you've ever visited is hosted on a server.
When online users want to view a webpage or website, all they have to do is to enter the webpage address into their search browser. The computer will subsequently connect to the server. And the browser will display the webpage. Generally, web hosts expect that the client already have a domain name so as to host with them. However, the web host can assist the client in purchasing a domain name in case they do not have one.
Click here to buy web hosting service.
What benefit an online business get from a web hosting service?
In order to publish the website online, a business website requires a web hosting service. However, a web host gives business owners more than just web hosting services! For example, web hosting firms typically employ in-house technicians to make sure that their client’s websites are up to date and running 24/7. And when client’s website is in need of help or troubleshooting (e.g., script debuting, email not able to send/receive, domain name renewal, and more), the web host's in-house support solves the issues immediately. A professional web hosting service ensures a hassle-free experience for business owners, so they can efficiently focus their time and effort on their businesses.
The Best Types of Web Hosting
There are various types of web hosting services available to host your website. Before buying any web hosting service, it is important to understand what kind of service your website and what kind of server you or your business required. How much budget you have, require? And what type of services the web host offers.
Web hosting service providers offer the following hosting types:
Shared Hosting
VPS Hosting
WordPress Hosting
Dedicated Hosting
Cloud Hosting
Reseller Hosting
Let's take a closer look at each of these options:
Shared Hosting
Share hosting is one's website placed on the same server as many other sites, ranging from a few sites to hundreds of websites. Typically, all domains may share a common pool of server resources, such as RAM and the CPU. The features available with this type of service can be quite basic and not flexible in terms of software and updates.
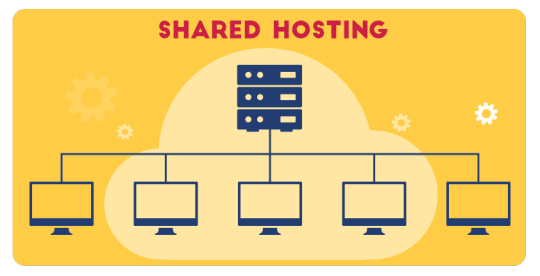
Shared hosting is the most basic type of web hosting. It’s cost-effective and the best choice for small or entry-level websites. Recommend shared web hosting to websites that are on a tight budget. Bloggers and small business owners who have simple websites are great candidates for shared hosting. Any website that doesn’t require too much on-site interaction or lots of resources will be fine with this hosting type. The biggest disadvantage of a shared hosting account is that you're at the mercy of the other sites on your server.
Click here to order web hosting service.
VPS Hosting
Virtual Private Server (VPS) divides server resources into virtual servers, where resources can be allocated in a way that does not directly reflect the underlying hardware. VPS will often be allocated resources based on a one server to many VPSs relationship, however virtualization may be done for a number of reasons, including the ability to move a VPS container between servers.

This hosting type is a step above shared web hosting. When a website outgrows their shared plan, it’s common for owners to upgrade to a VPS.
For those who want to run custom configurations to server, can get optional root access with VPS hosting plan.
WordPress Hosting
WordPress hosting is a particular form of shared hosting, created for WordPress site owners. Your server is configured specifically for WordPress and your site comes with pre-installed plugins for crucial tasks, such as caching and security.
Due to optimized configuration, your site loads much faster. WordPress hosting plans frequently include additional WordPress-related features, such as pre-designed WordPress themes, drag-and-drop page builders, and specific developer tools.

It is low cost and beginner-friendly. Here find customer support trained team to resolve WordPress issues. It is not for those who want to host more than one website on same server.
Dedicated Hosting
The user gets his or her own Web server and gains full control over it, user has root-access for Linux/administrator access for Windows. However, the user typically does not own the server. One type of dedicated hosting is self-managed or unmanaged. The user has full administrative access to the server, which means the client is responsible for the security and maintenance of his own dedicated server.
This allows for faster performance, as you have all the server’s resources entirely, without sharing with other website owners. You won’t have to worry about traffic from other websites impacting your performance.

It typically reserved for enterprise-level websites. It means more than 100,000 monthly visits, not to mention plenty of revenue coming in to afford the server.
Don���t even consider this type of hosting if you’re still struggling to pull in a few thousand in traffic each month.
Click here to order web hosting service.
Cloud Hosting
Web hosting, "cloud" means that a large number of computers are all clustered together and any applications running on them can make use of their combined computing resources. It refers to a network infrastructure that includes multiple physical servers connected via software.
This is a new type of hosting platform that allows customers powerful/ scalable and reliable hosting based on clustered load-balanced servers and utility billing.
Cloud hosting is the best option for medium and large business websites that are growing at a rapid rate. Private Cloud hosting solution is a single organization can take advantage of a cluster of servers in a private cloud environment and use the combined resources to fit their requirements. Public cloud hosting where multiple organizations reside in the same hosting environment, siloed from one another.

Customers can reduce hardware costs for their websites and applications while gaining redundancy and high availability.
If website traffic is unpredictable and it scaling at a steady rate in the coming months or years, then should consider a cloud hosting plan.
Click here to buy web hosting service.
Reseller Hosting
It allows clients to become web hosts themselves. Reseller hosting is not for everyone. Specially for those who are building a small website from scratch and looking to host a website on our own.
Resellers could function, for individual domains, under any combination of these listed types of hosting, depending on who they are affiliated with as a reseller. Resellers' accounts may vary tremendously in size: they may have their own virtual dedicated server to a collocated server. Many resellers provide a nearly identical service to their provider's shared hosting plan and provide the technical support themselves.

Reseller hosting is for agencies, web designers, and web developers. These are people who already have clients in this space, so they can just add web hosting to the services that they currently offer.
It sets uncapped prices to clients and improve existing services.
Here are some features you should be expecting from your hosting provider
Email Account
As mentioned earlier, most hosting providers require users to have their own domain name. With a domain name (e.g. www.yourwebsite.com) and email account features provided by your hosting company, you can create domain email accounts (e.g. [email protected]).
FTP Access
The use of FTP lets you upload files from your local computer to your web server. If you build your website using your own HTML files, you can transfer the files from your computer to the web server through FTP, allowing your website to be accessed through the internet.
WordPress Support
WordPress is an online website creation tool. It is a powerful blogging and website content management system, which is a convenient way to create and manage website. WordPress powers over 25% of websites on the internet. Most hosting providers will tell you right away if their plans are WordPress-compatible or not. The simple requirements for hosting your WordPress websites include: PHP version 7 or greater; MySQL version 5.6 or greater.
Click here to order web hosting service.
2 notes
·
View notes